 It isn’t enough to tell you that VirtualPBX offers an Email-to-Fax service. You want to know, truly and in detail, How can I send a fax from email?
Look no further than this step-by-step guide about how to prepare your documents and setup a workflow for digital faxing.
In the following sections, we’ll discuss the structure of a fax email, document types required for sending, and a few ways in which you can speed up the faxing process.
Structure of a Fax Email
There are only two parts to a fax email: The Recipient Address and the Email Attachment.
Both are easy to prepare with a practiced hand. Today, we’ll do a little research in your VirtualPBX Business Phone System account to get you up to speed.
Recipient Address
When you send a fax from email, the To: field of your email will need to contain an address that looks, for example, like 11234567890@kfa2t2j.sip.virtualpbx.net.
The structure is similar to other email addresses like marketing@virtualpbx.com. It follows the structure of recipient’s-phone-number@your-account-realm, so the example address above would send a fax from a VirtualPBX account to the phone number 1(123)456-7890.
You can find your own Account Realm address on the right-hand side of the dashboard of your VirtualPBX account. It looks like the image shown here.
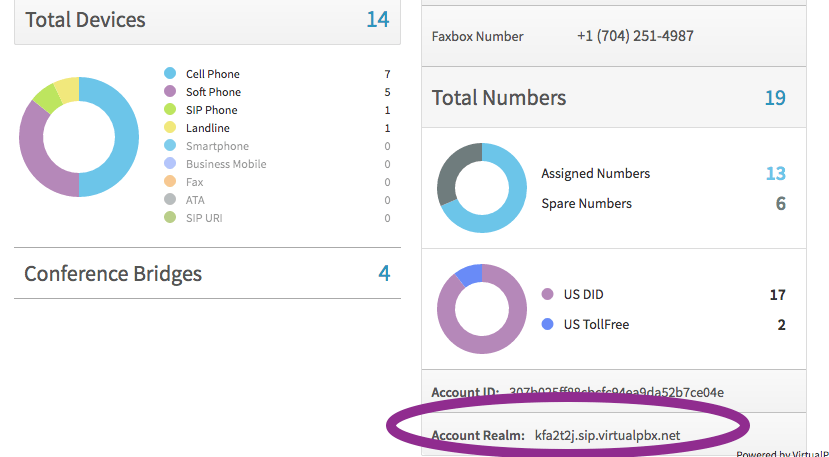 Your Account Realm will look different from the one shown above. It’s unique to your own account, and you use it every time you send a fax from email.
All that’s left is to plug in your recipient’s phone number.
Email Attachment
Your fax email won’t need a message. Instead, you attach a document to the email. Then VirtualPBX recognizes the document and faxes its pages to your recipient.
For instance, if you attached a PDF of an invoice with a cover sheet, it would send that two-page document as a regular fax to the destination phone number you provided.
Any text you include in the body of your email should be ignored when your fax is sent. Make sure everything you want to say is in your attached file.
The only caveat here is that you need to attach the correct type of file. Keep reading.
Document Types Required for Sending
VirtualPBX only accepts two distinct types of files as attachments in this situation: PDF and TIFF.
We can’t get into the particulars of every computer program here. However, many computer programs can save or export files to the PDF and TIFF formats.
 PDF
PDF
The Portable Document Format (PDF) is widely used and can carry both text and images as your faxed document. The image here shows how you can create a PDF in Google Docs.
In that case, you navigate in your main toolbar to File -> Download as -> PDF Document (.pdf).
If you choose to use the VirtualPBX Free Fax Cover Sheet (linked in the previous section), you can add pages to that file and save the entire document as a PDF from within Google Docs.
The process for other programs like Microsoft Word, LibreOffice, OpenOffice, and others will follow a similar pattern.
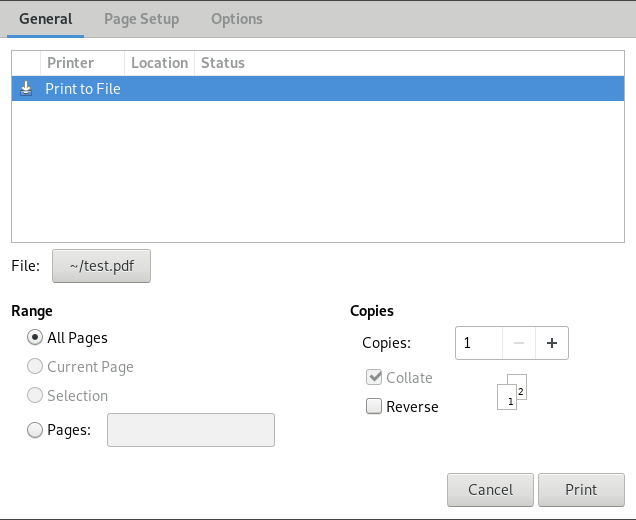
In a pinch, you can also use your web browser’s Print function to save websites and other documents viewable in Firefox, Chrome, Safari, IE, and Edge. Just navigate to File -> Print… and select Print to File before selecting your file name (with .pdf extension) and download location.
 TIFF
TIFF
The Tagged Image File Format (TIFF) is used by many graphic artists for its flexibility. It’s an excellent choice for sending as an fax email attachment if you only want to send an image.
Many image editors like Adobe Photoshop can save files as TIFFs.
With Photoshop you would choose File -> Save As… and then select TIFF from the Format menu.
Again, a similar process should occur with other programs, including the open source GIMP image editor, where you can select either Save or Export from the File menu to create a TIFF.
Speed Up Your Faxing Process
The best way to speed up this process is to make everything in your workflow standardized.
- Stick with a single program. Whether you send many text-based or image-based faxes, pick your favorite program for creating your fax documents. Then learn its document export process well.You may choose Google Docs because you can access it from anywhere. Its save-to-PDF process is also simple and straightforward. Once you’ve done it a few times, you can do it quickly and without thinking.
- Always export PDFs or TIFFs to the same directory. Regardless of the program you use, save its files to the same directory. This will make it simple to find your faxes when you import them into an email.
- Save your VirtualPBX Account Realm as an email contact. You can create a special contact in your address book for easy access. Using the example from earlier, you could create fax@kfa2t2j.sip.virtualpbx.net as a new contact.Then when you search your address book, you can simply replace the word fax in the address for your recipient’s fax number. That way, you don’t have to remember and type your Account Realm for every fax you send.
Now You Can Send a Fax From Email
If you’re not already a VirtualPBX customer, the steps above provide a good outline of the fax email process. They also shed some light on the processes you might see in your current digital faxing service.
Those guidelines, however, are no replacement for the information provided in our Faxing Support document. Once you’re a VirtualPBX Email-to-Fax user, you can find a breakdown of our dashboard and instructions for prerequisites like adding a fax number to your account.
We want to make faxing as easy for you as possible. Speak to a Sales rep today if you’re looking for a new, powerful phone and faxing platform for your business.


