 Not getting enough visibility into your business’s call activity? Take 10 minutes to create a weekly email report for yourself with this basic Zapier path that uses a timer and Google Sheets to send call data to your Gmail inbox.
Here, we’ll show you how to report the number of calls you received each week and customize your Gmail delivery to reflect that number. No more forgetting to check your call logs.
Other paths in Zapier you can take are shown in our additional tutorials — including Sending Voicemail Data to Google Sheets and Sending Call Data to Google Sheets, which link the VirtualPBX Zapier Integration with Google. This tutorial also directly references our instructions about Using Google Sheets Formulas to Count Calls.
Zapier uses an Action-Reaction format. In this Zap:
- Action: Zapier is scheduled to send an email report each week
- Reaction: Zapier retrieves data from a Google Sheet
- (2nd) Reaction: Zapier delivers the data through Gmail
You can follow along in this tutorial by starting from the top or moving to the individual sections below:
- Common Use Cases
- Preparation of Materials
- Start a Zap (Configure Zapier Timer)
- Update Google Sheet Data
- Send Email Through Gmail
Common Use Cases
Update VPs About Department Performance
Automate List of Morning Calls to Return
Keep an Email Record of Inbound Call Volume
Create Dynamic Team Briefing Notes
Zapier Path Preparation
In order to process information for your report, you will need to create a Google Sheet that accepts call data. You can make a copy of our Sheet template for this project before moving to the steps outlined below.
Sheet templates are also linked as starting points within our other tutorials.
Action
You will first need to select the Make a Zap button at the top of your Zapier home screen.

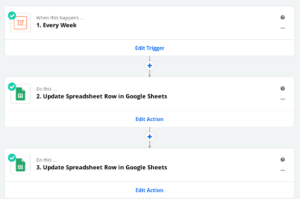
A new screen will load. This is where you begin working through the steps of your Zap. As your first step, you can select the Schedule by Zapier option.

Your Trigger Event in this Zap will be the Every Week option. This selection will tell your Zap to take further actions every week.

You can set your preferences for day of the week and time of day when you want your Zap to work.

Zapier Path Reaction 1: Update Google Sheet Data
As your second step – your first Zapier step taken and first Reaction to the Schedule trigger – click the plus sign on your screen and choose your App (Google Sheets) and Action Event (Update Spreadsheet Row).
Your selection of Update Spreadsheet Row here will inform Zapier about the contents of your Google Sheet.

Now choose the account where your calls are logged in a Sheet.

Next, select your Spreadsheet, Worksheet (the individual tab inside the chosen spreadsheet), and Row of data you want to retrieve.

The Column headlines shown in the Google Sheet screenshot at the beginning of this tutorial match the options shown here in the second step of the Zap.

Now we will update a field in our Sheet by rewriting the formula it already uses. In this case, the formula calculates the number of rows that meet a specific condition. You can learn more about this process by referring to our other tutorial about using Google Sheets to count the number of weekly calls a VirtualPBX account received.

The result of this process is an up-to-date count of the number of calls received within the past week. Updating the Google Sheet cell here lets us reference that cell properly in the next step where Gmail will send an email that reflects the count.
Note that the changes you make to cell formulas in a Zap will affect what’s shown in Google Sheets. Make sure your formulas are the same.
Zapier Path Reaction 2: Send Email Through Gmail
Click the plus sign again in your Zap to add another Zapier step. Select your App (Gmail) and Action Event (Send Email), and select your Gmail Account from which you will send the email.

Customize your email options by choosing recipients

Enter the Title and Body of your email. Dynamic values are available for inclusion here by clicking on the right-hand side menu of each bar. So in this case, you can see the dynamic value from our Google Sheet that shows how many calls were received this week.

Your report will change weekly as new data is sent from the VirtualPBX Zapier App into your Google Sheet. So the second step of this Zap, where your Sheet cell is updated, ensures that the data Gmail grabs will reflect current statistics.
Finally, you can send test data to Gmail to make sure your Zap is working properly.